
Learn how to automate tasks and how task automations work
Learning outcomes:
- What is task automation
- What is a checklist automation
- Create a checklist automation
- What is a time-based automation
- Create a time-based automation
- What is a status based automation
- Create a status-based automation
- Combine a checklist and time or status-based automation
What is task automation
Task automation allows you to create a basic workflow, or series of tasks that need to be completed at a certain time, in a certain order, to achieve a specific outcome.
Task automation drives the movement of tasks to ensure the correct tasks and processes are completed, at the right time by the right person. So when task A is complete, start tasks B and C. And when Task B is complete, start task D and E... get the picture?
Implementing task automation can supercharge your business processes, leading to process efficiencies, improved collaboration and increased productivity.
Task automations can be implemented on tasks on your homepage, or in the Task module.
To open the task automation center, click the more actions button on the task editor, then choose automate task.
%20(7)-2.png?width=688&height=516&name=app.waymaker.io_version-test_home_1607302858034x911938104401592300(iPad%20Pro)%20(7)-2.png)
What is a checklist automation
Any task can have a checklist. But we can use the checklists, to automate a status update on a task.
A checklist automation is activity based automation. By adding a checklist automation to a task means that when all the checklist items on that task are complete, the task status will be updated to complete. A checklist is a list of activities on the task that act as reminder for things that must be done to complete the task.
Create a checklist automation
In the task automation center, click the checklist toggle on to display the checklist input.

Type a checklist title and hit enter or tab to create the checklist. Add as many as you need. When you're done click done.
You can add more checklist items whenever you need in the task editor.
To complete a checklist, click on the red circle to the left of the checklist title. Once complete, a check will appear inside the circle.
Once you complete all the checklist items, the task status will be updated to complete.
What is a status-based automation
A status-based task automation is different to a checklist automation. A status-based automation creates a relationship between 2 tasks, think parent and child. The task you create the automation on becomes the child in the relationship and the parent task, or trigger task, triggers a status update on the child task.
When the trigger task status is updated to a specific staus, such as complete, the child task status is updated to a specified status such as in progress.
Create a status-based automation
To add a status-based automation to a task, in the task automation center, update the trigger toggle on. This action displays an input on the editor to search for the task that will trigger the automation. Start typing the trigger task's title and when it appears click it.
Then update the task status toggle on, choose the status this task (child) will update to, and then choose the status the trigger task (parent) should update to for the automation to be triggered.
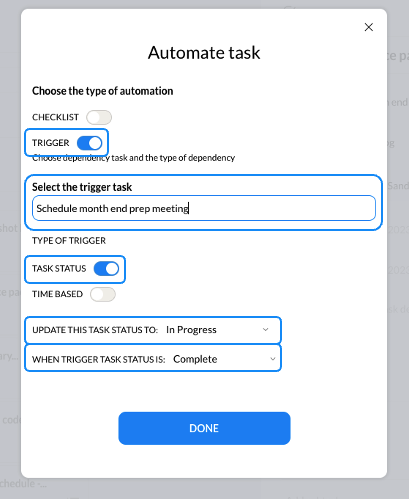
Click done to create the automation.
What is time-based automation?
A time-based automation is very similar to a status-based automation only instead of the child task status updating immediately, we can set a time period to lapse before the status update occurs.
Using time-based task automation enables a task status to update, such as to in progress, at a specified time period, eg 30 days, once another task status has been updated to complete.
For example, 30 days after a new team member starts, schedule a check-in to make sure the onboarding program is going as planned as you execute your employee experience strategy.
Create a time-based automation
Creating a time-based automation is very similar to creating a status-based automation. Instead of updating the task status toggle on, you click the time-based toggle. Then choose the status this task should update to, type the number of days to wait after the trigger task status is updated, and then select the status of the trigger task (parent), to trigger the automation.

Combine checklist automation with a status-based or time-based automation
There will be times when you need to combine automations on a task. So we made that possible too.
Turn on the checklist automation, then turn on the dependency automation, choose whether you will use the time-based or status-based automation, select the dependency, set up the trigger rules, and add your checklist.

Using the above as an example, when the dependency "Schedule month end prep meeting", status is updated to complete, 10 days later, update this task status to in progress. And when the checklist items are all complete, update this task status to complete.