Learnr how and when to use subtasks
Learning outcomes:
- What is a subtask
- When to use subtasks
- How to create a subtask
- How to know when a task is a headline task or a subtask
- Pro tips for using subtasks
What is a subtask
A subtask is a smaller, more specific task that is part of a larger main task.
Subtasks are used to break down complex tasks or projects into manageable and actionable steps. They represent the individual actions or components required to complete the main task.
Subtasks have a parent-child relationship that we refer to headline task (parent), and subtask (child).
Subtasks organized under their headline tasks to create a hierarchical structure indicating that it is a part of the larger task's scope. They are dependent on the headline task's completion and contribute to the overall progress of the main task.
When to use subtasks
Using subtasks is particularly beneficial when managing complex projects with multiple stages or when working on tasks that involve several individual steps. They ensure that all necessary actions are accounted for and completed as part of a project milestone.
Subtasks can be assigned to different team members or individuals, making it clear who is responsible for each specific action. They can have dependencies on one another or on the hedaline task. This means that some subtasks must be completed before others or before the main task can be considered finished. These dependencies can be automated using task automation.
How to create a subtask
To create a subtask, open the task editor for the headline task. Type the name of the sub task in to the input under subtasks, then hit enter or tab to create the subtask. The new subtask will appear under subtask input.
%20(2).png?width=688&height=516&name=app.waymaker.io_version-test_tasks_1607302858034x911938104401592300(iPad%20Pro)%20(2).png)
To add detail to the newly created subtask, clicking the title of the subtask will update the task editor to display the subtask's data.
How to know when a task is a headline task or a subtask
Its important to note, that a headline task cannot be a subtask of another headline task. And a subtask cannot have it's own subtasks.
When you open the task editor you will either see the subtask section or the headline task section. If you can see the headline task section, this indicates the task you are working on is a subtask. Clicking the headline task title will update the task editor to display the headline task's data.
%20(2)%20copy.png?width=688&height=516&name=app.waymaker.io_version-test_tasks_1607302858034x911938104401592300(iPad%20Pro)%20(2)%20copy.png)
When you open the task editor and you can see the subtask section with a list of subtasks, this indicates the task you are working on is a headline task. Clicking on any of the subtask titles will update the task editor to display that subtask's data.
%20(2)%20copy%202.png?width=688&height=516&name=app.waymaker.io_version-test_tasks_1607302858034x911938104401592300(iPad%20Pro)%20(2)%20copy%202.png)
When you open the task editor and you can see the subtask section, but it's empty, this indicates this is a task that has no subtasks.
%20(3)%20copy.png?width=688&height=516&name=app.waymaker.io_version-test_tasks_1607302858034x911938104401592300(iPad%20Pro)%20(3)%20copy.png)
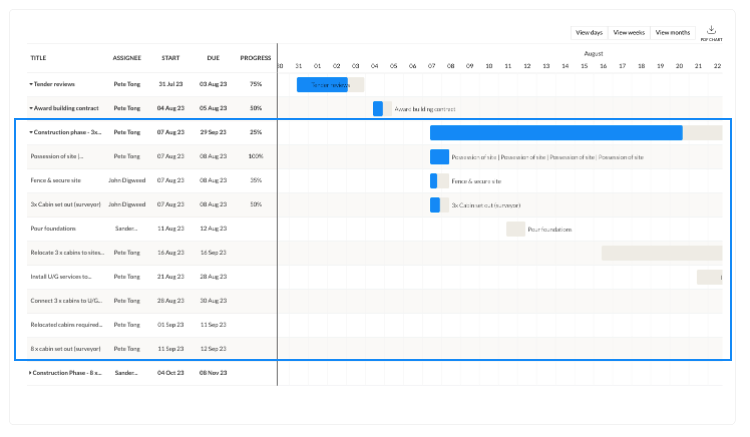
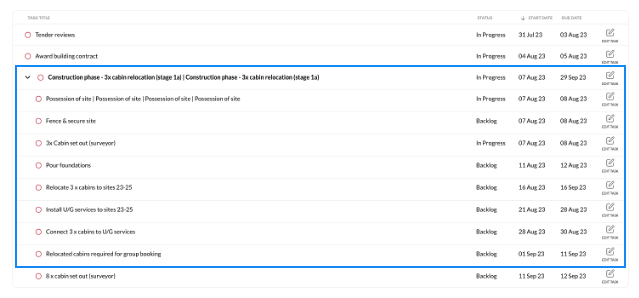
In the project management chart and on the task list view, subtasks are grouped beneath their headline tasks.


Pro tips for using subtasks effectively
-
Keep subtasks specific and actionable: Make sure each subtask is specific, measurable, and actionable, so you know exactly what you need to do and can track progress easily.
-
Break down tasks into smaller parts: Divide larger tasks into smaller, manageable subtasks to avoid feeling overwhelmed and to make progress tracking easier.
-
Estimate time needed for each subtask: Estimate the time needed for each subtask to help you allocate your time effectively and plan your workday more efficiently by adding them to your calendar.
-
Prioritize subtasks: Prioritize subtasks based on importance and urgency, so you know which tasks to tackle first.
-
Regularly review and update subtasks: Regularly review and update your subtasks to ensure that you stay on track and make necessary adjustments along the way.
By using these pro-tips, you can make the most of using subtasks and enjoy the benefits of a more organized and productive task management process.

%20(1)-2.png?width=688&height=516&name=app.waymaker.io_version-test_tasks_1607302858034x911938104401592300(iPad%20Pro)%20(1)-2.png)